Follow Me On Social Media!

Classic Sourdough Boule: Irresistibly Easy to Master at Home
Introduction to Classic Sourdough Boule
Baking a classic sourdough boule invokes an ancient yet exhilarating experience that transforms simple ingredients into a loaf that tells its own story. Each time you knead that dough, swirl it in a bowl, and watch it rise, you participate in a time-honored craft that connects you to bakers across generations. The aroma of freshly baked bread wafting through your home is nothing short of magical and is a reminder that patience and care yield delicious rewards.
Why Baking Sourdough is a Rewarding Experience
The journey of making a classic sourdough boule goes beyond just the final product; it’s about the process, the anticipation, and the joy that unfolds along the way. Here are a few reasons why this experience is so gratifying:
-
Connection with Tradition: Sourdough has been part of human history for thousands of years. By baking it, you’re joining a legacy that sees bread as a staple of sustenance and comfort. Each loaf carries stories of kitchens filled with flour dust and hands kneading dough in unison.
-
Creativity and Experimentation: Sourdough baking channels your inner artisan. You can tweak, adjust, and experiment with hydration levels, flours, and fermentation times. Your boule can be uniquely yours, reflecting your personal touch and creativity.
-
Live Fermentation: Unlike instant yeast, sourdough relies on natural fermentation with wild yeast and bacteria. Watching your dough bubble and expand is like nurturing a small living organism. It teaches patience and respect for nature’s processes, reminding us of the beauty of slow food.
-
Health Benefits: The fermentation process not only enhances flavor but also makes the bread easier to digest. Many find sourdough to be a healthier choice compared to commercially produced bread, making the experience not just satisfying but also beneficial.
-
A Sense of Achievement: Pulling that golden, crusty boule out of the oven is a moment of pure joy. You’ve poured time, care, and attention into something that is, at its core, a fundamental human need. The pride that comes from serving your homemade bread, shared with friends or family, can be deeply fulfilling.
Embrace the process, and let the classic sourdough boule be your companion on this rewarding culinary adventure.
Key Ingredients for Classic Sourdough Boule
Sourdough Starter: The secret to a truly remarkable classic sourdough boule lies in a well-fed sourdough starter. This bubbly mixture not only brings forth that signature tangy flavor but also infuses your dough with life. It’s like the beating heart of your baking process, activating the yeast and enhancing the fermentation, resulting in that airy texture we all love.
Warm Water: Next up is warm, filtered water. This simple addition plays a big role in activating the yeast within your starter. Using warm water ensures that your dough ferments efficiently, yielding the perfect rise and flavor.
Bread Flour: For optimal results, high-protein bread flour is essential. Its strength provides the necessary structure for your loaf, resulting in a beautiful rise and a chewy, satisfying crust that makes every slice delightful.
Sea Salt: Don’t overlook sea salt! It not only enhances the flavor but also strengthens the dough by promoting gluten development. This step is crucial for achieving that characteristic texture we love in sourdough.
Rice Flour: Finally, consider incorporating rice flour. While optional, it’s perfect for dusting your banneton or tea towel, preventing sticking and contributing to a beautifully crisp crust on your loaf.
Why You’ll Love This Recipe
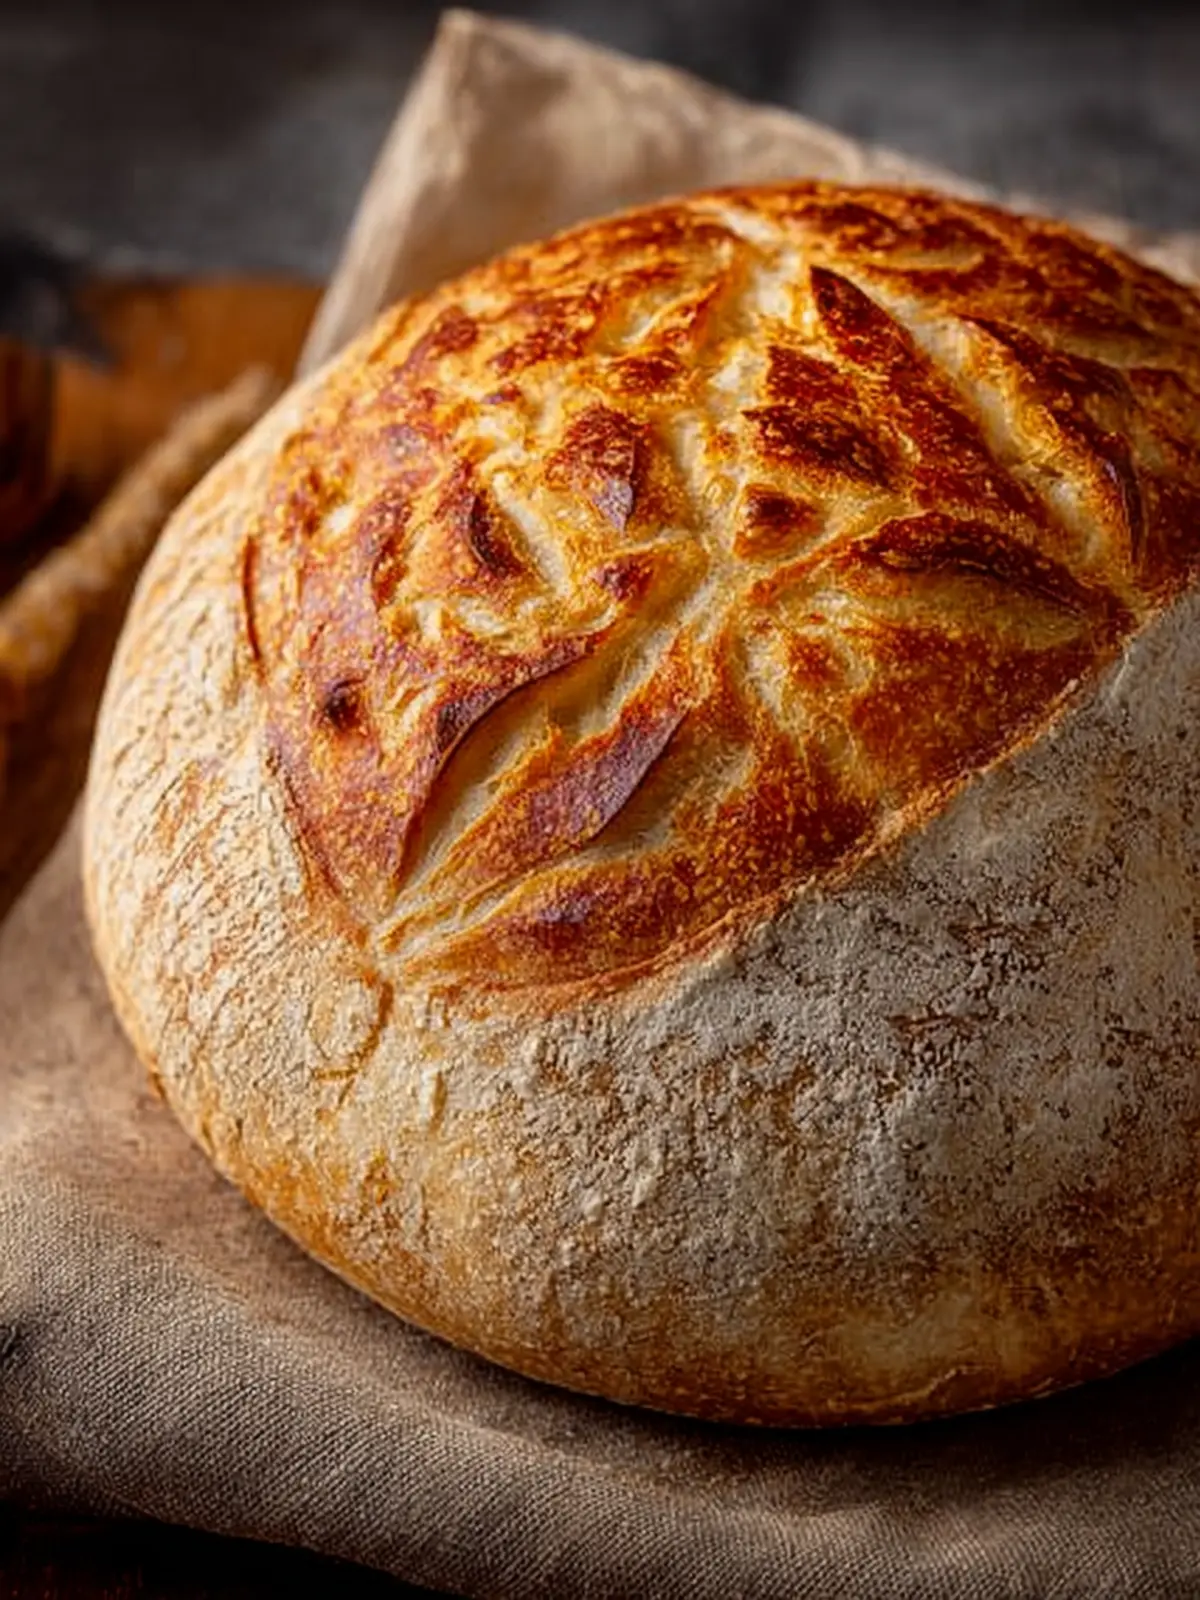
The moment you pull a classic sourdough boule out of the oven and fill your kitchen with its warm, rustic aroma, you’ll understand why this bread holds a special place in the hearts of many home bakers. Sourdough isn’t just about the bread itself; it’s the entire experience—from nurturing a starter to the satisfaction of crafting something completely from scratch.
The allure of homemade sourdough
Making your own classic sourdough boule not only connects you to age-old baking traditions but also invites creativity into your kitchen. The simple ingredients — flour, water, salt, and that beloved sourdough starter — transform into a crusty loaf with a chewy, tangy interior that’s simply irresistible.
- Taste and Texture: Your sourdough will impress with its balanced flavor profiles—a hint of nuttiness alongside that signature sour tang.
- Health Benefits: Fermentation is good for gut health; the natural probiotics from the sourdough starter can aid digestion.
- Endless Possibilities: Once you’ve mastered the classic sourdough boule, the possibilities are endless. You can experiment by adding herbs, cheeses, or even dried fruits.
Baking this bread will not only nourish your body but also bring joy and warmth to your home — and that’s a recipe for happiness!

Tips for Making the Perfect Classic Sourdough Boule
Creating a classic sourdough boule can feel daunting, but with the right approach, you’ll be kneading dough and scoring loaves like a pro in no time!
Secrets of sourdough success
-
Cultivate Your Starter: The heart of any great sourdough is a thriving starter. It takes time and patience, so make sure you’re feeding it regularly. A bubbly and active starter produces a perfect rise and that signature tanginess.
-
Perfect Your Timing: Sourdough fermentation is a dance of time and temperature. Don’t rush it! Allow your dough to rise correctly during bulk fermentation. You might find that extra hour makes a world of difference in flavor and texture.
-
Hydration Matters: A proper water-to-flour ratio is crucial. If you’re new to sourdough, start with 70% hydration—it’s doable and yields a beautifully open crumb. As you gain confidence, you can experiment with higher hydration levels for an even airier loaf.
-
Knead Evenly: When shaping your dough, ensure you’re working it evenly to develop that gluten structure. If you feel like your dough is too sticky, a little flour on your hands will help without compromising the dough’s hydration.
-
Temperature Control: Bake your classic sourdough boule in a preheated Dutch oven. The steam retention helps achieve a crispy crust and enhances oven spring.
Remember, each loaf has its own story—enjoy every step of the baking journey!
Time Breakdown for Classic Sourdough Boule
Creating a classic sourdough boule is a rewarding endeavor that transports you from your busy day to the comforting world of artisan baking. Understanding the time involved can help you plan your baking adventure seamlessly.
Preparation Time
The preparation time for your classic sourdough boule is about 30 minutes. This is when you gather your ingredients, mix the dough, and begin the first rise.
Dough Complexity Time
Next up, allow for about 4 to 6 hours for the dough to ferment and rise during bulk fermentation. This is a crucial step as it develops the flavors and structure of your bread.
Baking Time
When it’s time to bake, you’ll need approximately 30 to 40 minutes. Preheating your oven and ensuring your Dutch oven is hot are key for achieving that perfect crust.
Total Time
In total, you’re looking at roughly 5 to 7 hours from start to finish. While the active time is minimal, you’ll find that most of your day is spent waiting patiently as the magic unfolds. Happy baking!

Nutritional Information for Classic Sourdough Boule
Creating a classic sourdough boule isn’t just about the joy of baking; it’s also a celebration of simple, wholesome ingredients that nourish your body. As you dive into the delightful flavors and textures of this artisanal loaf, it’s essential to understand what’s in it—especially if you’re mindful of your dietary choices.
Calories
A single slice of this classic sourdough boule typically contains around 80 calories. This makes it a relatively moderate option, perfect for sandwiches or simply enjoying with a spread.
Carbohydrates
Each slice packs approximately 15 grams of carbohydrates. These complex carbs are a great energy source and will keep you feeling full longer, making this bread a satisfying choice for any meal.
Protein
In terms of protein, you can expect about 3 grams per slice. While it may not be a significant protein source, pairing your sourdough boule with toppings rich in protein can help create a balanced meal, ensuring you get everything your body needs.
Enjoy your baking and every delicious slice of your classic sourdough boule!
FAQs about Classic Sourdough Boule
When embarking on the journey of making a classic sourdough boule, it’s not just about the ingredients and the steps—it’s also about understanding the process and overcoming common hurdles. If you’ve ever found yourself wondering, you’re not alone! Here are some frequently asked questions that can guide you through your baking adventure.
What if my sourdough starter isn’t bubbling?
If your sourdough starter isn’t bubbling, it might be underfed or not warm enough. It thrives best in a warm environment, around 75°F to 85°F. Try placing it in a warmer spot or giving it a feeding with equal weights of flour and water. Sometimes it just needs a little encouragement, so be patient! It can take a few feedings to get active again.
How can I tell when the dough is ready?
Determining when your dough is ready can be quite a tactile experience. Look for these signs:
- Rise: The dough should double in size.
- Poke test: Gently poke the dough. If it springs back slowly, it’s ready. If it springs back quickly, it needs more time.
- Surface tension: The surface should look smooth and slightly domed.
Practice makes perfect, and with experience, you’ll develop that instinct for dough readiness!
Can I use different flours in this recipe?
Absolutely! Experimenting with different flours can add delightful nuances to your classic sourdough boule. While bread flour is ideal for its high protein content, you can blend in whole wheat, rye, or even spelt flour for unique flavors. Just keep in mind that different flours absorb water differently, so adjust your hydration levels accordingly. Happy baking!
Conclusion on Classic Sourdough Boule
Embarking on your journey to create a classic sourdough boule can be incredibly rewarding and delicious. The act of nurturing and feeding your starter allows you to connect with the time-honored tradition of baking. Don’t hesitate to roll up your sleeves and explore the art of sourdough—every loaf is a canvas for your creativity.
The enchanting aroma of freshly baked bread wafting through your kitchen will be your ultimate reward. Remember, practice makes perfect, and with each attempt, you’ll learn and improve. So, gather your ingredients, and let’s bake that beautiful boule!
Print
Sourdough Bread
- Total Time: 5 hours
- Yield: 1 loaf 1x
- Diet: Vegetarian
Description
A delicious homemade sourdough bread made with active sourdough starter.
Ingredients
Scale
- 125 g active sourdough starter (fed and bubbly)
- 325 g warm filtered water (around 90°F)
- 500 g bread flour
- 12 g sea salt
- Rice flour, for dusting the banneton or tea towel (optional)
Instructions
- In a large mixing bowl, stir together the warm water and sourdough starter until mostly dissolved.
- Add the bread flour and salt. Mix with a dough whisk, fork, or your hand until fully combined and no dry patches remain. The dough will look shaggy and feel sticky.
- Cover the bowl and let the dough rest at room temperature for 45 minutes.
- After resting, knead the dough in the bowl for about 5 minutes. Use your hand and a flexible dough scraper to fold the dough over itself. The scraper is helpful for lifting the dough and cleaning your hands. This short kneading session helps kickstart gluten development.
- Cover again and let the dough rest. Complete 3 sets of stretch and folds, spaced 30–45 minutes apart. For each session, perform 4 to 6 folds: wet your hand, lift and stretch the dough from one side, and fold it over to the other side. Rotate the bowl and repeat on all sides. This strengthens the dough and improves structure.
- After the final fold, cover and allow the dough to bulk ferment at room temperature. This step typically takes 4 to 8 hours, depending on your kitchen temperature. Look for the dough to rise noticeably, become domed and jiggly, and form visible bubbles along the sides and bottom of the bowl (a clear bowl is helpful here).
- Once bulk fermentation is complete, dust a clean work surface lightly with flour. Gently turn out the dough. Stretch it into a loose rectangle (it doesn’t need to be large), then fold each side inward toward the center like folding a letter. Starting from one short end, roll the dough up into a log.
- To shape the dough into a boule, use the push-and-pull method: gently cup your hands around the dough and pull it toward you along the counter to create tension across the surface. Then rotate it slightly and repeat, pushing it away, then pulling it back toward you again. Continue turning and repeating this motion until the dough forms a tight, round ball with a smooth surface.
- Place the dough into a banneton dusted with rice flour or lightly floured bread flour. If you don’t have a banneton, use a medium bowl lined with a thin, floured tea towel. Cover and transfer to the refrigerator to cold proof for 8 to 12 hours (Note you can cold proof up to 48 hours. If cold proofing more than 48 hours, this can cause your loaf to be flat when baked).
- When ready to bake, preheat your oven to 475°F with a Dutch oven inside for at least 30 minutes.
- Remove the dough from the fridge, turn it out onto parchment paper, and score the top with a sharp razor or bread lame.
- Carefully transfer the dough (on parchment) into the hot Dutch oven. For extra steam, you can drop 2 to 3 ice cubes between the parchment and the wall of the Dutch oven just before closing the lid. The added steam can help promote better oven spring and a shinier, crisper crust.
- To ensure the bread is fully baked, use an instant-read thermometer inserted into the center of the loaf. It should register between 205–210°F when done.
- Let the bread cool on a wire rack for at least an hour before slicing.
Notes
- For the best results, ensure your sourdough starter is active and bubbly.
- Monitor the fermentation closely as timing can vary depending on kitchen temperature.
- If using a tea towel, ensure it is thin and floured to prevent sticking.
- Using a clear bowl can help in observing the fermentation process.
- Prep Time: 4 hours
- Cook Time: 1 hour
- Category: Breads
- Method: Baking
- Cuisine: American
Nutrition
- Serving Size: 1 slice
- Calories: 150
- Sugar: 0g
- Sodium: 200mg
- Fat: 1g
- Saturated Fat: 0g
- Unsaturated Fat: 0g
- Trans Fat: 0g
- Carbohydrates: 30g
- Fiber: 1g
- Protein: 5g
- Cholesterol: 0mg